Monday, March 6, 2017

March Counterfeit Kit Challenge

Hello Blogland! 

Well, it's a new month, and that means a new Counterfeit Kit Challenge. This month's inspiration kit has lots of bright spring colors and plenty of florals and butterflies. It's a good thing I'm a complete sucker for anything with a butterfly on it. =) Here's the inspiration kit: 

February Hip Kit

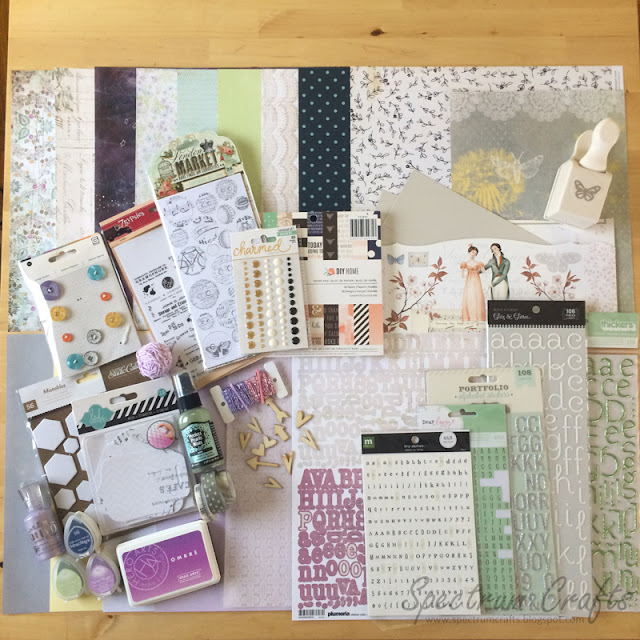
In making my kit, I was inspired by one of the Master Forgers who used a sheet of floral paper from an old Basic Grey collection, Tea Garden. I received the collection pack and some stickers for this collection in the box sale Basic Grey had when they closed down (still sad about this!). It was one of those things where you didn't get to choose what they send you...but you get a ton of stuff. I have to admit I was not initially excited by this collection, but when it came to counterfeiting this month, it actually turned out to be a great starting point. Here are my papers: 


The whole top row of papers is from the Tea Garden collection. From there I just chose things for my kit to coordinate with those papers. I knew I had that My Mind's Eye butterfly paper to match the repeating butterfly in the inspiration kit. I was pleasantly surprised when the colors matched the Tea Garden papers. I threw in another floral, a wood grain, a large stripe, and a tone on tone bird paper to round out my selection. 


I have LOTS of stickers this month. The first three sheets on the top came with the Tea Garden pack, so I threw them all in since I knew they would match. An old Dear Lizzy sticker book was also a good color match and it has some gold stickers to match the gold accents in the inspiration kit. I threw in some more butterflies in the form of these Studio Calico butterfly sticker sheets....I have had these forever and they are one of my favorite embellishments of all time. They seem to go with everything and, as I said, I'm a sucker for butterflies. =) I also found these random rub-on sheets while I was stash diving. The floral and gold go nicely with the theme of my kit.


I found lots of good alpha matches this month, including a sheet from Tea Garden. I pulled out this banner punch since I have a sheet of banner stickers in the kit. 


More butterflies! Including an entire matstack dedicated to butterflies! It's really not a surprise that I own such a thing. =P Also my "required" 6x6 pads and some stamp sets. One of the sets has an old-timey camera in it. There were cameras in the inspiration kit so I thought I might sneak them in with a stamp. 


A couple stencils and some mist to sneak in some more gold. =) The inspiration kit also had acrylic paints, but I decided I wouldn't designate a specific paint to my kit. I'll just choose whatever color is appropriate for each project.


One last photo of it all packed up and ready for crafting! I feel like I have soooo much stuff this month. Hopefully lots of projects will come out of this kit. =) 

Thanks for looking, and happy kitting!

*~M~*


Saturday, February 4, 2017

February Counterfeit Kit Challenge

Hello all!!

To start off: a little honesty session. I think it's high time I acknowledge that I'm a terrible blogger. Every 6 months-ish I think to myself, "Hey, I really should get back into blogging," and then I try it a few times and then give up again. The fact of the matter is, I find it incredibly tedious. Mostly because I hate the photo processing...er, process. Downloading, editing, uploading....etc, etc. So I have found that I much prefer the near lack of photo processing required to regularly post on Instagram. Which brings me to my actual point: I would love it if you would follow me over on Instagram. =) I try to post something there every day, generally with some success. I'm only going to post on this blog when I have a project that requires more photos or more wordiness from me, and there will be a corresponding post on Instagram any time I post here. I also find that it is much easier to interact with others there as the commenting process is much more streamlined and makes it simpler to find people. So, I look forward to connecting with you there! =)

On to this post: I'm very excited to be getting back into doing some scrapbooking kits with the Counterfeit Kit Challenge blog. I did a few months at the beginning of last year but then got side-tracked with summer classes and then the holidays, so it's great to be doing this again. I love the process of going through my stash and finding great stuff that I forgot I had. This month's kit in particular has some real oldies that I'm excited to get out into the light of day. But first....the inspiration kit:

Find the original kit here


I love how different this kit is. It feels slightly monochromatic with all the pale cool tones and simple black and white. It also presented a great challenge for counterfeiting because I couldn't think of any obvious similar products that I had, so I really had to go digging. I focused on trying to find purple, mint green and navy as well as small florals and polka dots for patterns to try to get something similar in feel to the original kit. Here's what I came up with:


 There are a few goals I've set for myself with this kit:

  • I wanted to make sure and include a 6x6 pad, because I have way too many of these and they need to get used. This also gives me more opportunity to do some cardmaking with the kit. 
  • I also wanted to include at least one stamp set and some coordinating inks to make sure my stamps and inks are getting some love. 
  • I have so many mists and paints that don't get used, so I made sure to pick out a matching one for this kit. 
  • I want to include punches or other tools in this and future kits, so that these are getting used as well. Plus they make it so easy to make your own embellishments! 
I think I managed to check off all my goals with this kit. Here are some details:


Here you can see just the papers. Along with the original kit there were some lovely coordinating cardstocks which featured a surprising pop of yellow. Initially I didn't think I would include that in my kit but I found a pretty solid yellow paper and a pattern with a bit of yellow in it that I fell in love with so yellow made it's way into the kit after all. =) That patterned vellum has the most interesting embossed texture. It feels almost rubbery...I'm glad I found this piece buried with some other patterned papers.


There were lots of label shapes in the original kit as well as some hexagon die-cuts in an embellishment kit so I was happy to find these pieces which can be colorized...possibly with this mint-colored mist or I may use some other inks if need be. I also love these washi tapes with their small-scale patterns.


I've been known to forget alphabets for my kits...but not this time!! =) I was surprised by how many I had in colors that matched the kit. It will be nice to get some use out of these.


Here are the stamp sets I chose...again I went with some label shapes so I can make some custom label die-cuts using the stamps and the coordinating inks I chose. I picked some chalk inks because I think the lovely soft effect will go nicely with the feel of this kit. Not sure how much use I will get out of the ombre ink pad since it's a bit dark, but I haven't used it yet so I'm excited to try it!


And here she is all packed away into an Iris container. You gotta love these containers. They are perfect for kits!

Thanks for reading! I have plans for some forgeries I want to try so I may have one other post here for that this month....otherwise I will be posting my projects with this kit over on Instagram! Hope to see you there! =)

*~M~*

Tuesday, June 7, 2016

Summer of Creative Chemistry - Week 1

Hello all!

I just have a quick share today of a tag I made for the Summer of Creative Chemistry over at Online Card Classes. I'm sooooo excited about this summer event. I was recently wondering if Tim was going to do another Creative Chemistry class with all the great new products that have come out, and sure enough...my prayers were answered! Even better, this month and next month are going to be a review of the first two classes, which I definitely need. It's been great to get out my Distress Inks again and reviewing the classes has given me some much needed energy for creating. The challenge for the first week of the event was to make something using at least four colors of Distress Ink, using any of the techniques from class. Of course, I had to make a tag. =)


I used an oldie-but-goodie technique on this, the trusty blended spritz and flick. The colors of Distress I used were: Peacock Feathers, Victorian Velvet, Peeled Paint, Spiced Marmalade, and Frayed Burlap. One thing I'm rediscovering about Distress is that you really can't make a wrong choice when it comes to color. They all blend together so beautifully and in so many interesting ways that it seems no matter what colors you choose the result will be amazing. You gotta love these inks. =) 

After making my background, I used a Memory Box butterfly diecut for my focal point. After gluing this down and doing a little stamping around it with Walnut Stain Distress, I added some shimmer to the butterflies with a Wink of Stella pen, then added in their bodies with Liquid Pearls. The finishing touches were some ribbon I dyed with Victorian Velvet ink, some linen ribbon, and a heart charm attached with a wire pin. Here's some close-ups:


I like how open the diecut design is so that you can still see the blending and texture of the background. 


Thanks for looking today! Here's to a very creative summer! =) 

*~M~*


Wednesday, April 13, 2016

A Page for March

Hello again!

Did anyone else have a problem with March?? It was a very strange month for me. I started out great in January - I was very inspired by the idea of a fresh start, I set myself some new crafty goals, and decided to try out some new things. Things were going well, and in February I felt like the inspiration just kept rolling in. I was really productive and I just couldn't get enough of playing with my crafty supplies. Then all of a sudden - BAM! - March 1st rolled in and my inspiration and crafty mojo completely abandoned me! I didn't even want to be anywhere near my craft room or paper supplies. What the heck?!? I got a little knitting done last month, but that was the grand total of my crafty productivity (I didn't even actually make anything, I just made a swatch to practice some skills =P). From what I saw on Instagram and a few other crafters' blogs, I wasn't the only one. Apparently March Mojo Madness is a thing, and by that I mean the madness that comes from having no crafty mojo! =D (Maybe I should rename it March Mojo Misery??)

Anywho, this was one of those times where the goals I set at the beginning of the year really came in handy. Even though I was completely uninspired, at the end of the month I realized I needed to do at least one scrapbook page to keep up with my goal of one page per month. (I don't really care that much WHEN the pages get done, as long as I have at least 12 at the end of the year, but I didn't want to fall "behind" this early in the year.) So I FORCED myself to my desk and started looking through some photos. Once I got started again, I could feel the mojo starting to come back. Giving myself that goal to be accountable for was a great motivator to get me back in the craft room again.

My inspiration came from this photo of myself and my cousin's daughter from this last Thanksgiving. My cousin and I joke that she is my "spirit daughter" because, even though she isn't my daughter, her personality is so much like mine that sometimes it seems like she could be. When we took this photo I knew I would want to make a page about this connection we seem to have.


I used my February counterfeit kit to make this page. I started out by making a grid of patterns on my background using some of the plain Project Life cards as well as some papers from the 6x6 pad that I cut to size. Then, feeling emboldened by my sewing success on this card, I broke out the sewing machine again to sew down the cards and add a little detail to the grid. I placed the photo on a plain white mat to make sure it would stand out on top of all that pattern and color, and then I made a tag for my journaling so I could hide it behind the photo. 


I wanted this page to reflect me offering her encouragement both now and as she grows up. Having lived as me for over 35 years, I know that being like me can be rough sometimes, and I don't ever want her to forget how awesome she is. These phrase stickers from Tim Holtz were perfect to show a little of this on the layout (it's also in my hidden journaling). I especially love this longer one I was able to fit below the photo, almost like a caption. =) 


Some close ups of the other sentiments on the page...as well as the pinwheel embellishments I got to make with the pinwheel punch! I'm so glad I had this punch in the kit. These were just perfect for this page. =) 


This title was pretty fun too. I used the white Thickers I already had in my kit, but I wanted a script-like font for the other half of the title, and I didn't have anything like that in my kit. I found some DIY Thickers in my stash....do they still make these?? Basically they have adhesive on the top and bottom, so you can add glitter or micro beads to the top in any color you want. But I had a eureka moment when I realized I could probably use foil with them! I tried it on a random symbol sticker I was probably never going to use and it worked! I had to stick down the title letters first and then add the foil because they are quite delicate once the foil is added, but I loved the final result. =) 


One last close up of my sewing because I still can't believe I did that much of it and didn't screw up ONCE. =P  (Now I've completely jinxed myself for next time.) Also this floral pattern is adorable. =)


Thanks so much for looking!  

*~M~*


Monday, April 11, 2016

New Month, New Kit

Hello all!

I'm back, after a month's hiatus, with a new counterfeit kit for April. I'm pretty excited about this kit so let's get right into it. Here's the inspiration kit for this month:


There are a handful of add-on kits and even a mixed media kit for inspiration as well which are visible on the Counterfeit Kit challenge blog

With the black, butterflies and vintage elements, this kit immediately reminded me of the Curio collection from Basic Grey that I've had in my stash, virtually untouched, for so many years I've lost count. I decided that for my kit papers this month I would use the whole collection and build the embellishments around that. Here's a sampling of some of my favorites from Curio:


Most of the papers have a black border around the edge, which is part of why the inspiration kit reminded me so much of these. I didn't add them to my kit, but I'm sure I will probably be pulling out some plain cardstock, most likely cream or kraft, for my pages since many of these patterns are pretty busy. 


For my embellishments I started by pulling out what little Curio embellishments I had, which are the buttons and die cut pack shown here, as well as a large sticker sheet and some dimensional stickers I have in another photo. I also already had the gold letter stickers featured in the mixed media kit, so I pulled those out along with some wood grain letters in the same style. Then I just sort of grabbed everything I could find that had butterflies, black, or some vintage elements to them, like the tiles, doilies and journaling cards. I threw in the flowers because the inspiration kits had lots, and grabbed a coordinating pack of plain Project Life cards because I really liked having those in my kit last time. The wood veneer birds I threw in for added texture and because birds are a feature of the Curio collection. 


I've also really enjoyed having 6x6 pads to work with in my kits. I think I've gotten more use out of them this way than in my card-making! This month I grabbed two: the MME one has a very similar style to the Curio papers, and I thought the cream and white papers in the White Fern stack would be nice to have for contrast. 


Last, but certainly not least, are the letter and sticker sheets. The large sheets came with the Curio paper pack, so naturally I threw those in. I also found a sheet of kraft circle labels I thought I might as well include in case they came in handy, as well as a sheet of vintage book paper. Two sets of Thickers and the dimensional sticker sheet round out the kit. 


I have to admit I am really excited about all the beautiful things in this kit, but I'm also slightly intimidated because the style of the kit is a little outside my comfort zone. I worry I won't be able to find photos that I feel fit this kit. I will have to embrace this challenge! Since I skipped last month this is my third counterfeit kit and I am really enjoying the process of kitting my own supplies, and I love crafting with the kits as well. Later this week I will have a page to share with you I made using February's kit, and there should be a page using this kit soon! =) 

Thanks so much for looking!

*~M~*


Monday, February 15, 2016

One More Valentine

Hello all!

I have a late Valentine's day card to share with you today. This post was supposed to go up yesterday but my weekend got a little crazy what with working and sneaking in some time with the partner-in-crime last night for dinner and a movie. =) I still wanted to share this card though because I used my kit from this month to make it, and I was excited that I got a second use from this kit already. The Echo Park 6x6 pad I chose for my kit has a good range of colors in it so that I could make a nice Valentine without it feeling too frilly. Also, I thought the arrow paper I liked so much could stand in for Cupid's arrow. =) Here's the card I made:


I really liked this floral corner embellishment which made it easy to use a big piece of patterned paper as a background, and all I had to do was build the focal point. I made that using one of the Project Life cards from my kit, and I layered some of the gold glitter tape under a strip of the arrow paper to help it stand out. 


I thought this sentiment card could use a little something extra, and since I was already thinking about using some stitched elements on these Project Life cards this month, I broke out my sewing machine and did a zigzag stitch at the top and bottom of the card. I left the tails of thread hanging off a little to add a bit more texture. I got a sewing machine for just this purpose but I rarely use it, so it was nice to dust it off and get some use out of it! =) 


The sentiment itself is from the Simon Says Stamp stamp set "Paper Hugs". It's the same set I used on my previous Valentine's Day card

I think that's all for today! I've already set a new record for this year by getting two projects out of one kit. =P (Although I still have last month's kit and plan to use it some more.) 

Thanks so much for looking!

*~M~*


Friday, February 12, 2016

Valentine's Card...with Foil!

Hello all! I have a quick share today of a card I made using a new-to-me technique: foiling! Foil has been super trendy for at least a year now - maybe two - but it's taken me a while to jump on this particular bandwagon. I just wasn't a huge fan of it at first. Recently, however, there have been a lot of new products designed so that you can add your own foil to projects like, for instance, the Minc machine. I'd been contemplating buying this machine more and more lately as they came out with cool products to use with it that mean you don't have to worry about printing things in toner in order to have fun with it. When my local stamp store, Impress, offered a class showing different foil techniques, I decided to give it a whirl in the hopes that the class would help me cement my feelings about foil, and the Minc, once and for all. In the end, it definitely did; I fell completely in love!! =) I ended up buying the machine and some accessories. I haven't had time to play with it at home yet, but I'm hoping to have some projects (or at least experiments =P) to share soon. One of the techniques in class involved using foil with double sided adhesive and die-cuts so that you could have foiled die-cuts without needing a machine at all! I loved this technique and tried it almost as soon as I got home. The card I have today is the result.


When I was at Impress for the class I picked up this beautiful Basic Grey paper pad (why, oh why have they stopped making patterned paper?? =..(  ) and the foil-patterned washi tape in addition to my foiling supplies.  The butterfly die and XO stamp are both from Simon Says Stamp.


This foiling technique uses some double-sided adhesive made for using with foil. I think it's really the same as any other foam adhesive except that it comes in sheets and is thin enough to use with wafer thin dies. You just cut your die cut, remove the top protective sheet from the adhesive, lay your foil down and rub it into the die cut with your fingers. Like all foiling techniques there is a little magic moment when you remove the foil sheet and a beautiful foiled creation is left. =) The results for this technique aren't as smooth as when you use toner with the Minc or a laminator, but it is still shiny and beautiful, and less of an investment if you don't want to buy fancy equipment.


Foil is notoriously difficult to photograph, but I managed to get this fairly nice close up where you can see the true color of the foil. I used the gorgeous rose gold color from Therm-O-Web. 

Thanks so much for looking today. I would definitely recommend trying this technique...but only if you are prepared to become completely hooked! =) 

I will see you Sunday with a Valentine's Day card made with my February Counterfeit Kit

*~M~*

Followers